Showing posts with label block printing. Show all posts

Monday, January 2, 2017

Armchair eagle-watching

"Sauces Canyon - 2016", linocut, 6" x 6"


I recently realized that I'd never written a post about this linocut that I did last year. It's based upon an image that I grabbed from the webcam footage of a nesting bald eagle out in California's Channel Islands National Park. My son is a wildlife biologist and works with the Institute for Wildlife Studies' bald eagle project out on Santa Cruz Island; this print was his birthday present. 

It's particularly timely that I started writing this post now: thanks to new-and-improved webcams, we can see that this season's nest building is getting underway! I hope you'll take a minute to check out the footage; seeing these natural wonders up close is something that not many people are able to do, but we can share in the experience thanks to today's technology!


Here's the screen shot I grabbed while watching the live video...amazing, isn't she?

Then, I did a drawing, simplifying the image. (Oops, forgot to save that!) In a reduction linocut, you don't use separate blocks for each color, you carve away parts of a single block between each layer. At the end, you're left with just the block for the last color; there's no going back to print another edition in the future. 

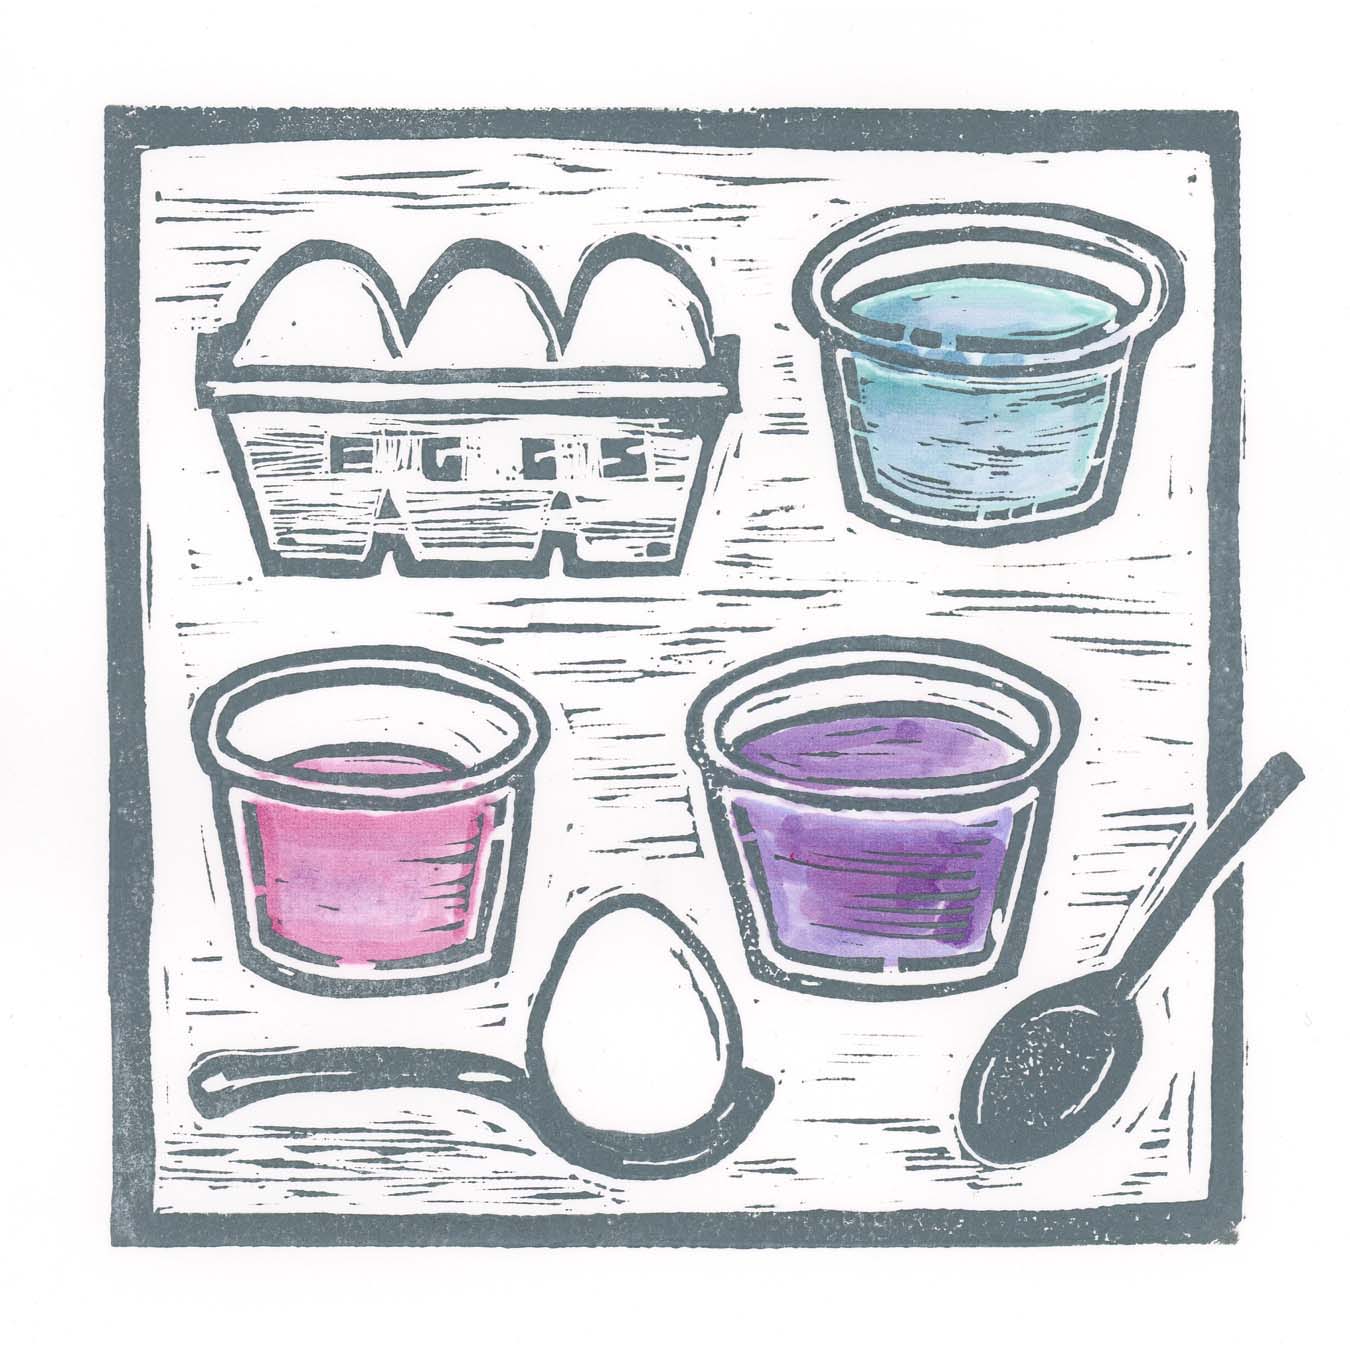
To start, I carved away the parts I wanted to stay white (the paper color) before printing the first of 5 layers - this blue-green that you see in the upper right of the final piece. 


Then, while those dried, I carved away the area stays THAT color and printed this medium green...
and so on.  (Sorry for the bad lighting...)


I'm still relatively new to block printing, so things didn't line up perfectly on all the prints, and "real" linocut artists would frown at my somewhat splotchy coverage, but I think it adds to the rustic, outdoorsy feel that's appropriate here. I made a little "stamp" to add the yellow beak, so actually, it's a 6-color print.

In the end, all I'm left with is this carved-up block:

and this! (The best of only 8 that were worth keeping.)

I can't wait to see what happens in the nests this year!

Tuesday, June 21, 2016

This is me and my pet butterfly

"Anise Swallowtail Butterfly"
Linocut with watercolor

I usually seek out the subjects of my drawings and prints, but this one found me. A couple of months ago, I was visiting Alcatraz Island with my daughter and her fiancé. It's my favorite tourist-y thing to do in San Francisco: Along with a tour that, after all these years, I still find fascinating, you get a great ferry ride out, gorgeous plants and birds, and perfect views of San Francisco and the Golden Gate Bridge from the middle of the Bay.

While we were waiting for a return ferry (you can stay out there as long as you like until the last ferry) a group of kids behind us started getting all excited and were trying to get my attention: "There's a butterfly on your shoulder! It's right on your shoulder!" Sure enough, there was—a beautiful swallowtail. One of the kids could hardly take a breath: "Take a picture! Take a picture! And post it on social media and say, 'This is me and my pet butterfly!'" This one's for you, precocious kid behind me in line.


I couldn't let that beautiful image go, so I decided to do a linocut. But I didn't plan very well, and learned some lessons. I should've (and still could, I guess) printed the body color under it first. With these b/w prints, I can hand-color with colored pencil or, if I use non-waterbased ink, I can add water color (see above). I've tried both, sampling my new jar of black Akua soy-based ink, and some new Japanese paper. I also should have done this on un-mounted linoleum, so I could've cut away all if the blank area around the butterfly. I had to make a mask, or frisket, to keep those areas from showing traces on the print.


It's such a beautiful creature, colored or not!


Monday, January 18, 2016

Linocut Portrait of Daisy


Before I post the drawing that will answer the riddle from my last post, I wanted to share a little 6x6 two-color linocut print that I did for a friend's birthday. (I forgot to scan the best print before I gave it to her; this one was one of the "seconds" from the batch.)

I started with a photo, knowing that my main color would be black, and Daisy's pink color, tag and tongue were perfect for the second color. Flat black areas can be a challenge when you're not using a press or oil-based inks, but I think that the mottled effect works pretty well as dog fur! (I've found that dampening the paper works well to get good coverage, but with water-based inks, I couldn't dampen the paper already printed with pink.)

I've still got an awful lot to learn about block printing, but it's such fun!

Thursday, December 17, 2015


"C is for the candy canes hung on the Christmas tree..."

So begins "The Christmas Alphabet", a song that I learned a gazillion years ago in kindergarten, and have sung every holiday season since. Or at least I thought I had learned it. When I looked it up while writing this post, I read that the first line is, in fact, "C is for the candy trimmed around the Christmas tree...huh?! I've been singing it wrong all of these years?! (It was some consolation that I had remembered the rest of the lyrics correctly.)

Well, accuracy aside, I was inspired to start a series of 5"x5" Christmas alphabet linocuts. There seem to be quite a few artists who enjoy doing an alphabet series; I think that they bring structure and direction on days when inspiration is lacking. For me, an alphabet also appeals to my sense of nostalgia, and my love of letters.

I'm planning on doing just the letters that spell Christmas, not the whole alphabet, at least for now. (At the rate I'm going, it may be a few Christmases before I'm finished!) You got a sneak peak of the second letter ("H") a couple of posts back, but I started with the piece shown above, based upon this drawing that I did a couple of years ago.

I'm working on mounted linoleum blocks, not the softer pink material that I sometimes use. I had been frustrated with lino the first time I tried it, before realizing that it had to have been an old piece. Lino hardens as it ages, making carving a real headache. The red holly berries on this print were added with colored pencil, rather than doing separate printing. Traditionalist printmakers would have my head for taking that shortcut, methinks.


I supposed it's fine that the candy cane lyrics were my own; I'd already taken liberties with the other song lyrics: I'd much rather draw H is for HOLLY, rather than HAPPINESS, so I'll just decide things as I go. Any predictions as to what I'm planning for R?

My blog posts have been a bit sparse this month as I've been busy getting ready for Christmas, but once the holidays pass, I'll be back to a more regular schedule of posting.

Happy holidays to all! 

Tuesday, November 17, 2015

H is for...

In one of life's amusing little coincidences, I'm working on this linocut block...


...and I'm reading this book.


Sunday, November 8, 2015

Let it snow...

I've had the block printing bug again lately, and everything seems to be Christmas-themed. I'll be posting about all of them, but first up is this little snow globe.

There are snow globes of all kinds and price ranges, but I love the little vintage "dimestore" plastic ones.


I drew this one as a tiny 2.5" sketch one day, and couldn't get it out of my head, and it became this 3-color print, starting with this larger sketch to set up the registration marks for the different colored blocks.


I ended up re-carving the red block after a flaw showed up in the printing (as you can see in some of the prints above. ) So, several runs later, I had a number of acceptable ones. But with the amazing accuracy of today's scanners and printers, I can now use the image on cards and other prints, and it is hard to tell the original (bottom) from the inkjet (top):

Here is the progression of the printing...I love seeing the layers build upon one another:


...let it snow!

(Well, here in Northern California, we'd be happy with some rain!)

Tuesday, March 3, 2015

The simple joy of dyeing eggs

6" x 6" on 8" x 8" paper
watercolor and water-soluble printer's ink on Arches 88 paper
click to enlarge


Chicks and rabbits, daffodils and tulips, jelly beans and marshmallow peeps—I adore Easter-y things. But my favorite Easter tradition of all is dyeing eggs. Over the years, our family has experimented with just about every known way to color and decorate eggs. Store-bought kits, natural dyes, tie-dyeing, markers...I even bought this kit ages ago but was never quite industrious enough to tackle those detailed Ukrainian designs.


I may feel brave and try it out this year, but really and truly, the method I love best is the classic: Drop that little Paas color tablet into a cup of water (not those fizzy tablets, I like the ones that require hot water and vinegar) or better yet, get out the food coloring and mix up some colors of your own. I always have either the malted milk "robin's eggs" or Cadbury caramel eggs close at hand. Dyeing eggs requires sustenance.

With this little linocut image, I was trying to convey the simple joy of taking that plain egg and choosing which color to use first. I was going to cut separate blocks for the dye cups, but decided to paint them in with watercolor before pulling the print. That way, I could play with different colors, etc. (I use water-soluble printer's ink, so I couldn't do the watercolor after the printing.) I'm still learning about printing and watercolors, so there was a lot of experimentation!

Here's the uncolored print:


and here's one printed on Stonehenge Kraft and hand-colored with colored pencils:


Finally, I scanned one and made smaller digital prints for some cards. 
I just love my printer (Epson Artisan 1430), it's hard to tell the digital prints from the hand-pulled ones!


Tuesday, January 20, 2015

A Box of Chocolates

(click to enlarge)

Well, I still can't get enough of linocut printing. This latest piece that I did for Valentine's Day is another reduction print, meaning that first you carve away the areas that you want to stay the paper color. After that first color is printed (the "milk chocolate" color in this piece) you carve away the areas that you want to remain the color that you just printed, and so on. Some artists even do reduction prints of twenty or more colors! One of my favorites is Sherrie York. Her website and blog show the steps in her process so beautifully. Amazing. Ok, back to my little print...


After printing the milk chocolate and dark chocolate, I "cheated" and made a separate little block for the red heart. I was going to put a border around the image, but after playing around with it, I decided that I like it as is.


I ended up with about ten prints that turned out with varying degrees of success including the one at the top of the post, from which I've made slightly larger digital prints for my Etsy shop. I love how they turned out: I can hardly tell the difference between the original block print and the reproductions!


So, along with this Christmas one, there are now two "A Box of..."

What should be next?


Tuesday, December 23, 2014

Sleigh bells ring...are you listening?


Well, my block printing obsession seems to be here to stay. After spending hours on a detailed pencil drawing, it's so satisfying to pull print after print off of a carved block. This little print is based upon this drawing of a sleigh bell from a few years ago. It was my first time doing a 2-color print that isn't a reduction print, so it was a bit tricky getting things to register.

 I was thinking that I'd do a separate block to print the red ribbon attached to the bell, but I ended up liking the image of the bell by itself. And I really liked stringing them onto festive string...


...and using them as tags on Christmas packages. Hmmm...maybe I'll make more and use them as garland next year!


I also wanted to do an original little composition of traditional red glass ornaments in a box. The possibilities are endless as far as printing options: varying the colors, etc.


It always takes lots of planning to figure out what prints where...!


I really had trouble registering this one; I ended up re-carving one of the blocks...ugh. I believe that I got one that turned out perfectly. But I love it and I think it will inspire a series of things in boxes...we'll have to see! In the meantime, happy, happy holidays from my house to yours.

Monday, October 27, 2014

The block-printing bug...and a Guinness or two


It all started innocently enough when I was drawn to the vintage graphics on this brayer box at an estate sale. A few weeks and a few purchases later, I'm in the throes of a block printing obsession.


(There are tons of wonderful block-printing tutorial videos and instructions online—I especially like Linda Cote's site—so I won't go into a lot of the "how-to" details of preparing your drawings, etc. Feel free to ask questions in the comment section.)

For the first pass, I used a little block of Speedball's "Speedy Cut" material. (It's either white or blue in the stores.) Yes, it's super easy to carve, but the eraser-like material doesn't hold up all that well to multiple cleanings or larger print runs. Here's the block I used for my first little piece, seen above:


Confidence boosted, I decided to try a regular carving block of linoleum. I chose one of my favorite old drawings to adapt. At first, I was discouraged at how difficult it was to carve. But I realized that I was trying to carve too deeply; once I got the hang of it, it was great fun.


This material gives your cuts more of a traditional woodcut look, but it'll take some more practice for me. However, I may not return to the lino, because I'm in love with Speedball's "Speedy Carve", as you'll see below. (Why Speedball named their two materials so similarly is beyond me...I just call it "the pink stuff" now.)

Feeling pretty brave at this point, I decided to make try a two-color reduction print for my son's girlfriend's birthday, using a photo I'd taken of her beautiful Doberman, Guinness. Yes, I did an overlay on this one, not an original drawing, but it was a photo that I took myself. I decided not to create my own drawing, because I wanted to capture this specific dog, and we all know that we, as pet owners, know every little unique detail of our animals.

The Speedy-Carve is soft enough to cut easily, but retains its edges beautifully through multiple cleanings and printings. I experimented with different  papers, etc. My new fave is Arches 88...those prints turned out beautifully.


On a reduction print, you print the lightest color first, then cut away everything that remains that color to print the next color. Obviously, this creates a limited edition—there's no going back to that first layer! But if you used a little homemade jig like I did (see below), it makes registration a breeze. In fact, getting those two colors to align perfectly was my biggest fear, and they all came out lined up perfectly!


Here's my set-up: a piece of foamcore board with a hole cut the exact size of my block but not quite as thick. An L-shaped corner to register the paper against, 


and I made a "mask" out of heavy paper to quickly lay over the image after inking so that the stray inking marks would be covered up and wouldn't print. I learned that many experience printers prefer rubbing the back of the paper with a wooden spoon rather than a traditional baren. Easy and cheap!

I made about a dozen and got quite a few pretty nice prints out of those, but this was my best one, all framed up to send off!


I'll never give up my pencil drawing—in fact, I'm having a great time on a new piece at the moment—but there is definitely a lot more block printing in my future!